Buying the right tools Buying the right tools for your hobby is important if you want to do a good job. Starter glasscutter..
NZ.$ 4.80 plus G.S.t 
cheap glasscutter can be found in most hardware stores for under $6,
however is useless if you want to work in stained glass.It's cutting
wheel blunts quickly and easily and can cost you much more, if you
waste a lot of glass, because it wont cut properly. good oil glasscutter.
NZ.$ 32.50 plus G,S.T 
The preferred glasscutter for stained glass is (above) an oil-cutter,
it is slightly dearer to buy, but will save you money on the glass
as it is easier to cut with and it will last you a much longer time. Glass pliers.
NZ.$ 15.50 plus G.S.T 
Don't just get a pair of pliers out of the tool box, chances are they
will chip and break the glass.A pair of grozing pliers are (above )cheap and
have the proper mouth opening as needed for breaking glass. Glass grinder..
NZ.$ 195.00 plus G.S.T handling free in NZ. 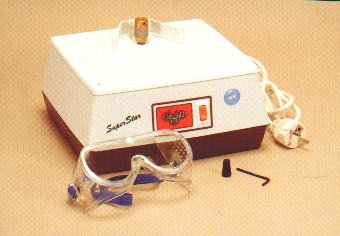
You will need to invest in a grinding machine, (above)the grinder
which fills with water and has a diamond grinding head is in my opinion
a good buy and with proper care will last you for years. 80 Watt "Weller" Soldering iron..
NZ.$ 78.50 plus G.S.T 
You will need an 80 watt "Weller" soldering iron,(above) which are very good
quality soldering irons.Again in most hardware stores you may find
copper tip soldering irons which are no good, they wear down quickly
and don't do as good a job. All the tools illustrated are the ones we use and have done so from
the beginning.In our opinion, they are the best tools for stained
glass.They are good quality tools which will last you for years,provided
of cause you look after them properly.
Please read on for easy care instructions The Glasscutter: Your glasscutter has a screw top undo this to pour in some fine machinery
oil, when pressure is applied during cutting the oil will flow forward
lubricating the little diamond wheel of the glasscutters head.However this also leaves a
film of oil on your glass which has to be wiped off before you can
apply the copper foil, otherwise this will effect the stickyness of
the foil.Another alternative is to leave the glasscutter standing
in a glass with a bit of machinery oil in when you're not using it
and just wipe the oil off before you start to cut.Also don't let other people use your glasscutter as everyone has a
different way of how they hold and guide it.Avoid dropping it onto
the floor and when cutting avoid damaging the edges of the glass.
2.The Grinder : Don't forget to fill your grinder with water and to use the sponge
to moisten the grinding head.
If you're not using the grinder for a longer period of time, empty
the water.Also don't move the grinder from one place to another when
there is water in.
Residue buildup from grinding has to be removed every so often, a
flat spatula can be used to slide over the bottom.
3. The Soldering iron : Turn off the soldering iron when during your work you have to do something
else, even if it is just to fix a sandwich.
When you have finished using the soldering iron for the day let it
cool off, then undo the little screw which holds the solder irons
tip and remove the tip.If you don't do this the tip will eventually
burn itself into the soldering iron and wont be able to be removed
when you want to replace it.
Don't use anything harsh on your soldering iron like sandpaper to
get rid of the gung buildup on the tip.When the soldering iron is
hot use a cloth to quickly wipe it off or take a quick dip into the
flux.
Remember when your tools do get worn down there are replacement parts
available, which are cheaper than buying a brand new tool.For example
on the grinder the grinding head gets the most wear, it can be adjusted
to a higher or lower setting or turned over so that you can use almost
every angle on the head.The same with the soldering iron, the tip
usually wears down first and that can also be replaced with a new
one. 1 go to.. CLASSES-Chapter-1 problem..... Contact Us Features 2 |